For the first lesson we decided to incorporate a get-to-know-you activity. Our focus for this lesson was material exploration. Without knowing too much about our group we made the following plan. Although the first meeting went well we did not capture any photos of the first lesson. Instead I have shared a photo of some finished work created during the lesson. Follow the link to the blog for Day 1 and there is more to learn! http://spring16servicelearningcc.weebly.com/blog/previous/5
Service Learning Lesson Plan 1
Title: Getting to know you Group/Date: 02/08/16
Community Connections Kellyn, Erica and Crystal
____________________________________________________________
Lesson Idea and Relevance: What are you going to teach and why is this lesson of importance to your students? How is it relevant to students of this age and background?
_____________________________________________________________
______________________________________________________________
______________________________________________________________
Essential Understanding (s): What are the “big ideas”? What specific understandings about them are desired?
______________________________________________________________
_______________________________________________________
Essential Question (s): What provocative questions will foster inquiry, understanding, and transfer of learning?
_______________________________________________________
______________________________________________________________
Outcomes - Students will be able to..
______________________________________________________________
______________________________________________________________
______________________________________________________________
Student Reflective Activity: Through what authentic performance task(s) will students demonstrate the desired understandings? How will students reflect upon and self-assess their learning?
______________________________________________________________
Students will share and reflect on their creative discoveries with their peers and teachers through a group review/critique.
______________________________________________________________
______________________________________________________________
Assessment Instrument (s): By what criteria will “performances of understanding” be judged?
______________________________________________________________
Students will each be individually asked about their processes.
Student and teacher will discuss student's intent with their processes. Some questions that might be considered are:
Good: Student demonstrates understanding of exploration by completing several works incorporating several or all of the demonstrated techniques.
Getting it: Student demonstrates understanding of exploration by completing any works using any of the techniques demonstrated.
Not Getting it: Student demonstrates difficulty with concepts by showing disengagement, confusion or lack of desire to complete at least one of the tasks.
______________________________________________________________
______________________________________________________________
Pre-assessment: How will you help the students know where the unit is going and what is expected? Help the teacher know where the students are coming from (prior knowledge, interests)?
______________________________________________________________
______________________________________________________________
______________________________________________________________
Motivation: How will you hook all students and hold their interest?
______________________________________________________________
Exploration theme: I wonder....
Demonstration of techniques that encourages student interaction:
During lesson questions:
______________________________________________________________
Ideation: How will you equip students, help them experience the key ideas, and explore the issues to generate ideas for their art work?
______________________________________________________________
______________________________________________________________
Procedures: How is the lesson organized to maximize initial and sustained engagement as well as effective learning? Provide opportunities to rethink and revise their understandings and work? Allow students to evaluate their work and its implications? Include literacy and numeracy?
______________________________________________________________
Personal Intro time:
______________________________________________________________
______________________________________________________________
Materials and Resources: What is needed to complete the learning plan? List materials and resources in a bullet-ed format.
______________________________________________________________
______________________________________________________________
______________________________________________________________
Preparation and Safety: What do you need to prepare for this experience? What safety issues need to be addressed? List steps of preparation and safety in a bullet-ed format.
______________________________________________________________
1. Materials will be prepared for students before they arrive.
2. Offer gloves to students when using the processes.
______________________________________________________________
______________________________________________________________
Accommodations: How is the lesson tailored (personalized) to the different needs, interests, and abilities of learners? ...Access (Resources and/or Process) and Expression (Products and/or Performance)?
______________________________________________________________
TBD
______________________________________________________________
______________________________________________________________
__________________________________________
Title: Getting to know you Group/Date: 02/08/16
Community Connections Kellyn, Erica and Crystal
____________________________________________________________
Lesson Idea and Relevance: What are you going to teach and why is this lesson of importance to your students? How is it relevant to students of this age and background?
_____________________________________________________________
- Students will engage in a get-to-know-you activity and talk with teachers about their choices. It is important for students and teachers to each other to understand expectations.
- Students will learn about material through exploration. Exploration is an important part of life and learning.
______________________________________________________________
______________________________________________________________
Essential Understanding (s): What are the “big ideas”? What specific understandings about them are desired?
______________________________________________________________
- You can do many things with materials: known and explored
_______________________________________________________
Essential Question (s): What provocative questions will foster inquiry, understanding, and transfer of learning?
_______________________________________________________
- How do artists know what materials do?
- How do artists choose their materials?
______________________________________________________________
Outcomes - Students will be able to..
______________________________________________________________
- Students will explore the materials provided and techniques demonstrated, then apply that information to create art.
- Students will compare and contrast their work with their peers work and recognize the materials and process used to create the work.
- Students will be able to infer the art making process in the art work of others.
______________________________________________________________
______________________________________________________________
Student Reflective Activity: Through what authentic performance task(s) will students demonstrate the desired understandings? How will students reflect upon and self-assess their learning?
______________________________________________________________
Students will share and reflect on their creative discoveries with their peers and teachers through a group review/critique.
______________________________________________________________
______________________________________________________________
Assessment Instrument (s): By what criteria will “performances of understanding” be judged?
______________________________________________________________
Students will each be individually asked about their processes.
Student and teacher will discuss student's intent with their processes. Some questions that might be considered are:
- What did you do first, second ....?
- What did you discover when you.....?
- What did you like about the process?
- What would you do next using the same materials?
- What do you still wonder about (materials, ideas)?
Good: Student demonstrates understanding of exploration by completing several works incorporating several or all of the demonstrated techniques.
Getting it: Student demonstrates understanding of exploration by completing any works using any of the techniques demonstrated.
Not Getting it: Student demonstrates difficulty with concepts by showing disengagement, confusion or lack of desire to complete at least one of the tasks.
______________________________________________________________
______________________________________________________________
Pre-assessment: How will you help the students know where the unit is going and what is expected? Help the teacher know where the students are coming from (prior knowledge, interests)?
______________________________________________________________
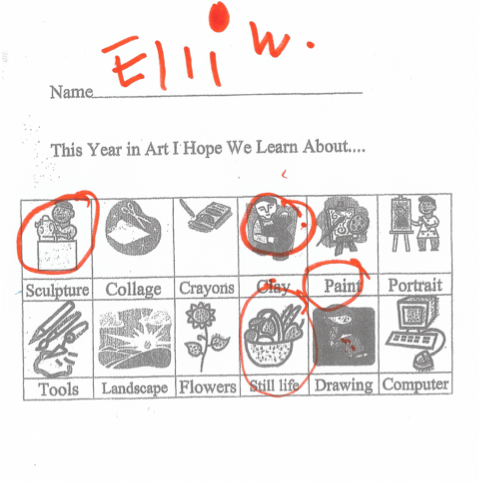
- Through the introduction activity the students will indicate what they already know about and what they would like to learn about by making different marks on the worksheet images.
- Students will be asked before demonstration: Has anyone used tissue paper to create art? How did you use it? Do you think there are other ways to use tissue paper in art? How?
______________________________________________________________
______________________________________________________________
Motivation: How will you hook all students and hold their interest?
______________________________________________________________
Exploration theme: I wonder....
Demonstration of techniques that encourages student interaction:
- While demonstrating the painting technique with tissue paper have a conversation about what you are doing. "Oh look at what happened here, I put some glue mixture over the tissue paper and it made a mark beyond. I wonder what would happen if I took it off and put another color there?"
During lesson questions:
- Students will be shown visual examples and inspiration for different possibilities of using tissue paper in the art-making process.
- Students will be encouraged observe their peers’ explorations and hear from their peers about their discoveries.
______________________________________________________________
Ideation: How will you equip students, help them experience the key ideas, and explore the issues to generate ideas for their art work?
______________________________________________________________
- Discuss different ways the material (tissue paper) can be used and then encourage students to explore with the material to find other ways that it can be used.
- " Look what happens when I do..."
______________________________________________________________
Procedures: How is the lesson organized to maximize initial and sustained engagement as well as effective learning? Provide opportunities to rethink and revise their understandings and work? Allow students to evaluate their work and its implications? Include literacy and numeracy?
______________________________________________________________
Personal Intro time:
- Teachers will introduce themselves (approximately 5 minutes)
- Students will be encouraged to introduce themselves through an introduction activity. Teachers will explain that the icons on their worksheet represent different art activities that we could do. Teachers would then ask the students to circle all of the activities that they are interested in doing for the next four lessons. Students complete first task, then teachers request that students then color the activities that they have already done. (approximately 15minutes)
- "Today will be working with colored tissue paper and glue, we would like to share with you a couple of techniques that you can explore."
- "Before we get started let's see by raise of hands how many of you have worked with tissue paper before."
- "How many ways do you think that you can use tissue paper in art? Lead into demonstration.
- Printing: Lay tissue paper on white stock and brush with solution. Wait a couple of seconds (could be dramatically thinking) then "No, I really do not like that there." pull up tissue paper, " Oh! look what happened." This is one way that you can use your tissue paper, you can print the color onto your paper, then stick the tissue paper somewhere else on your work.
- Painting: This is similar to the previous technique in that the color bleeds off of the tissue paper and "stains" the work paper.
- Allow students to explore this technique for several minutes. (approximately 10-15 minutes) Observe for quick learners and lack of engagement.
- Overlapping colors: With this technique you overlap tissue colors to create new colors, the more solution you use the more transparent the tissue becomes. This could create a mosaic of colors and shapes.
- “bleeding” colors: this technique combines the previous three demos. The colors of the tissue paper are moved and blended over the work paper.
- Ask students how they think artists choose their materials and how artists know what materials to use by bringing in visual examples and inspiration. Give students time to reflect on how their explorations are going and generate ideas for further direction as artists using this particular material for their art-making process. "What have you discovered so far?"
- Resists: using oil pastels, or glue; demonstrate how resists work with tissue paper painting.
- Seek, find and draw: In this demonstration one of the first demo sheets can be used (if it is dry) to show the students how to "find" pictures and shapes in their creations and draw them in.
- The students will be asked to put away their materials and leave their work out for others to view. Students will be encouraged to walk around to look at their peers work.
- Teachers will review essential questions through conversation with students about their finished works.
______________________________________________________________
______________________________________________________________
Materials and Resources: What is needed to complete the learning plan? List materials and resources in a bullet-ed format.
______________________________________________________________
- Paper
- Multiple colors of tissue paper diluted glue
- cups
- brushes
- roll mats
- markers, crayons and pastels
- paper plates
- paper towels
- gloves
- copies of introduction activity sheets
- Name tages
- Lesson plan
______________________________________________________________
______________________________________________________________
Preparation and Safety: What do you need to prepare for this experience? What safety issues need to be addressed? List steps of preparation and safety in a bullet-ed format.
______________________________________________________________
1. Materials will be prepared for students before they arrive.
2. Offer gloves to students when using the processes.
______________________________________________________________
______________________________________________________________
Accommodations: How is the lesson tailored (personalized) to the different needs, interests, and abilities of learners? ...Access (Resources and/or Process) and Expression (Products and/or Performance)?
______________________________________________________________
TBD
______________________________________________________________
______________________________________________________________
__________________________________________
 RSS Feed
